

Jim Krause | Classes | P351 Video Field & Post Production
Week 14
Reality Check/Announcements
- Final Projects - Aim to have a rough cut by the end of this week. If you do you'll be in good shape for next week. Have your project turned in before it's due. Lateness will result in a point penalty.
- Next week we will NOT have lecture, but will do some review for the final exam during Lab Time.
- AM Lab next week will start at 10 AM.
- FINAL EXAM: The Fall 2022 Final Exam is 12:40 – 2:40 PM, Friday, December 16. (Day & time assigned by registrar.) The Final Exam will be administered via Canvas (so you can take it in the comfort of your home).
Agenda:
- Technical / Stylistic Delivery Specifications
- Real-world AV Monitoring & Analysis
- 2k, 4k, & 8k
- Emerging Technology
- Robotic/Motion Control Camera Systems
- High frame rate cameras
Technical & Stylistic Delivery Specifications
Professional video editors must be able to deliver media with video and audio levels that are broadcast legal and with content that meets the required style guidelines. Different distributors/networks have their own specific technical and aesthetic guidelines.
Sample delivery specifications for broadcast TV:
- PBS Program Guidelines & Policies - The Red Book
- PBS TOS - Technical Operating Specification
- BBC TV
- Discovery Channel Technical Specifications
To make your sequence (almost) ready for broadcast-TV:
- Deliver it in an acceptable container and codec (E.g. mxf OP1a using XDCamHD422@50 Mbps)
- Follow appropriate style guidelines (length of program, length of credits, placement of lower thirds and bugs, etc.)
- Use drop frame (DF) timecode
- Include closed-captions
- Make sure all video levels are in the legal broadcast range (0-100 IRE or 0-700mv)
- Make sure audio is in phase and levels are within the legal broadcast range
- Include 30-60 seconds of Color Bars at the start of your sequence (with the 1kHz tone at the appropriate level such as -20 dB)
- Slate (important production info including: title, date, producer, running time & audio format, etc.)
- Black (approximately 10 seconds or optional countdown)
- Program start time of 01;00;00;00
- Black video tail at end
While the technical specifications might seem daunting, knowledge and the right tools make the process relatively easy to achieve. To create videos for broadcast, learn the basics of color correction and how to use the tools avalable to monitor and objectively analyze the signal.
Real World Video Monitoring & Analysis
While it's possible to use Media Composer's or Premiere's built-in waveform displays, editing software isn't ideal for this. There's limited real estate on screen and editing software is optimized for editing, not monitoring. Most professional editing suites have an external reference monitor and waveform and vectorscope displays.
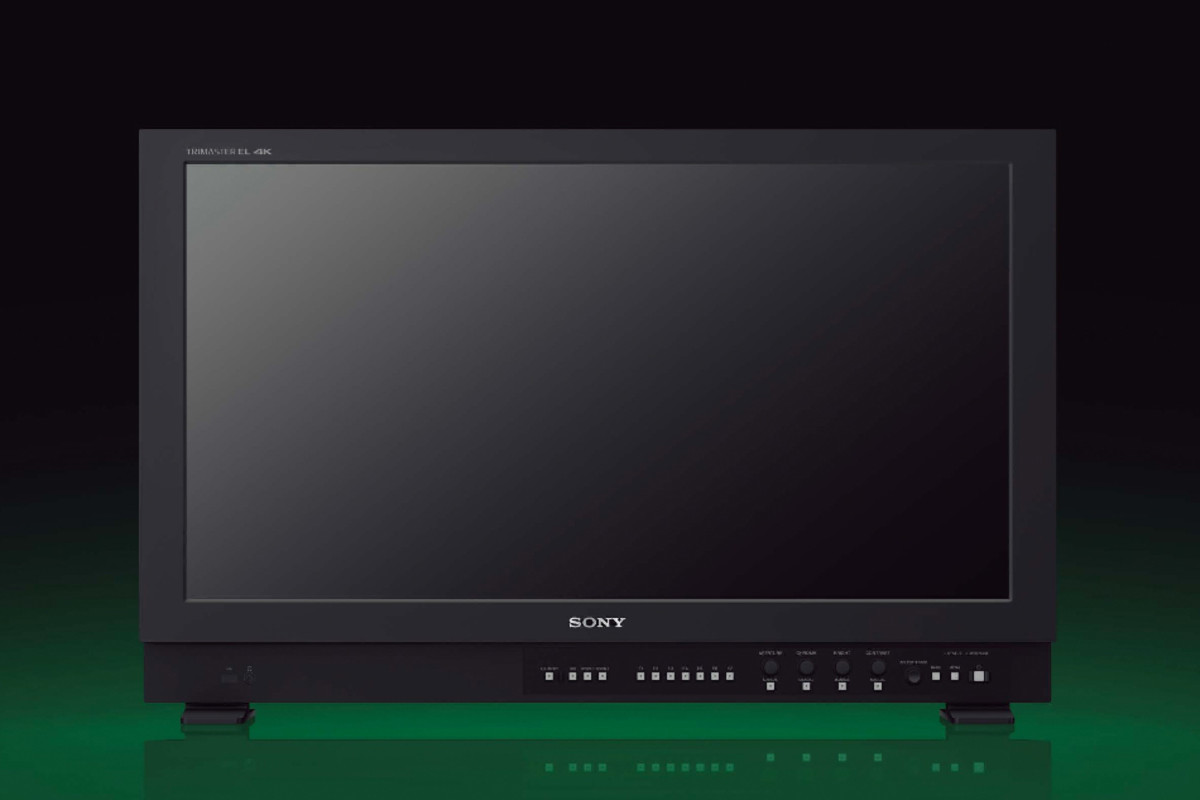
Broadcast reference monitors are excellent tools, but can be expensive. (The Sony BVM-X300 V2 monitor above retails for $14,000.)
Any monitor will provide bad feedback if not setup properly. An inexpensive HDTV or 4K monitor can work fine- as long as the hue, chroma, brightness, and contrast have been setup properly.
Regardless what monitor you have, the first step is to use a reference signal, such as SMPTE color bars. With re the first place to start examining your signal and checking the appearance of your monitor. (You can generate these with almost any profesisonal camcorder or edit system.)
Step #1: Setup your monitor. Here's an article on how to setup your monitor from Videomaker.
Step #2: Monitor the signal (E.g. external waveform/vectorscope display)
There are many options of external waveform monitors and vectorscopes available. (Link to B&H listings)
Black Magic Designs Ultrascope
Professional editors used to have to spend $5,000-$40,000 for dedicated monitoring gear. Now it can be had for as little as $600. I used a Black Magic Design's Ultrascope. There are several versions: a PCI card version, a dongle version (which you can use with a laptop in the field), and stand-alone rackmount versions. The display looks like this:
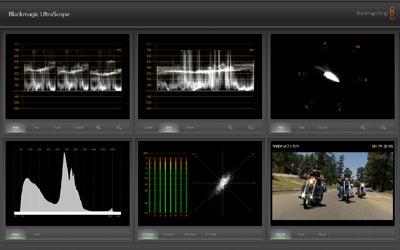
It provides:
- RGB Parade
- waveform monitor
- vectorscope
- histogram
- audio levels & spectrum
- video monitor
- error logging
Error logging is an important and significant feature. It automatically looks for non-legal video and audio elements. You essentially: turn on the logging, start playing your footage, and go to lunch (let the entire program play and be logged). It records the errors and the time they happened.
If you are interested in learning more about color correction and preparing programs for broadcast I highly recommend Scott Carmichael's Color Correcting and Finishing class.
With a properly setup reference monitor and some form of signal monitoring you can begin making technical and aesthetic adjustments to your media.
Safe Text Area, Revisited
Adding & framing graphic info - Even though the move to 16x9 HD broadcast happened years ago, back in 2009, many are still offering 4x3 SD content. Commercial work often needs to comply by using a 4x3 center cut safe zone. In the example below 4x3 guides have been overlaid into FCP's existing 16x9 safe action and safe text guides.
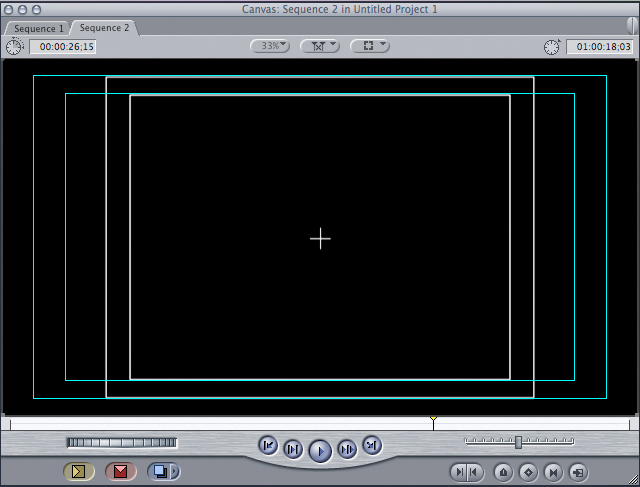
The image above shows a 4x3 mask placed underneath Final Cut Pro's 16x9 safe action and safe text guides. Many video cameras have a variety of viewfinder guides you can toggle through.
Here's a link to a 15-second spot that had to fit inside the 4x3 safe action and safe text areas:
Jim's Portable Edit Setup:
When I'm traveling light and need to edit, I rely on a 15" MacBook Pro with an iPad serving as a 2nd monitor/screen. To monitor video, I use a small 7" monitor- the ikan D7w (pictured below). It's got a built-in waveform monitor, and vectorscope, both HDMI and HD-SDI loop-through inputs, and is large enough to provide critical info for focusing but small enough that it can be attached to a camera. I've also been using a FeelWorld Z73, which so far has been working great.
The ikan D7w Field monitor:

Premiere lets you add additional monitors. Once one is plugged in go to Premiere Preferences / Playback. You'll want to check the box under "video device" next to your monitor.
Under the "Window" menu you can choose "Reference Monitor" to open an additional monitor if needed.
2K, 4K, Ultra HD and beyond................
HD is great but there's something even better: 4K. But first let's start with 2K.
2K provides only slightly more information than HD. 2048 pixels per line compared with 1920. But the format was embraced by the digital cinema industry. The Phantom Menace introduced the world to Digital Cinema and Digital Cinematography.
- Digital Cinema is not about production- but the distribution of theatrical content.
- Digital Cinematography refers to using a digital workflow to create films.
But most have ignored 2K and focused on 4K.
4K refers to video format with approximately 4000 pixels in width. Check out the wikipedia entry on it. It has a good visual comparison of the various formats. 4K has roughly four times the data as HD. There are a few different iterations of 4K:
- 3840 x 2160 (Main consumer format. Square pixels)
- 4096 x 2160 (Digital cinematography format. Non-square pixels.)
While many cameras can shoot in 4K, it requires much more data than HD. In order to capture, playback, and edit, one needs extremely fast data access. Professionals who shoot in 4K often use external recorders, which are designed to handle high data/bitrate formats. A major benefit is that the external devices can record uncompressed (or minimally compressed) formats, recording directly into Apple ProRes or Avid DNX.
External recorders:
UltraHD (Ultra High-Definition) at this point refers to consumer formats above 3840 x 2160. 4K and 8K are examples of UHD formats.
8K refers to a video format that's approximately 8000 pixels wide. Here's a link to a wikipedia article on 8K.
It's possible to produce and deliver content at even much higher resolutions. (E.g. 10k 10328 x 7760 pixels). Here's a link to a 10k timelapse video shot in Brazil.
Emerging Camera Technology ................
Motion Control Systems allow complex camera movements to be programmed and carried out numerous times. They can range from simple pan/tilt/lens control to sliders (with lateral movement) and even to a full blown motion control arm.
Motion Control Systems
High frame rate cameras allow for ultra-smooth slow motion. Note that higher frame rates require more light.
High speed (high frame rate) cameras:
Mixing a motion control system with a high frame rate camera can result in extremly dynamic imagery:
Vocabulary
- 2K
- 4K
- 8K
- Broadcast Safe levels
- Digital Cinema
- Digital Cinematography
- UHD Ultra High Definition
- Waveform monitor
- Vectorscope
