

Jim Krause | Classes | P354 Program Graphics & Animation
Week 11 -
Agenda:
- Tuesday: Review homework & Practice Motion Stabilization
- Thursday: Motion tracking & share Final Project ideas (60 seconds)
Refer to Chapter 29 Motion Stabilization of the Meyer book.
Additional resources:
Video sources you can use:
- Standard definition media: download SD video clips from the Meyer book (203 MB). NOTE: These video files are 4:3 standard definition clips (720x486 & 720x480).
- High definition media: download HD video clips from the instructor. (735 MB) NOTE: These video files are 16x9 high definition clips. (1920 x 1080)
Motion Stabilization in After Effects ----------------------------------------
Watch this example of Motion Tracking (Motion Array Tutorials)
Note how the edges of the video become visible when the footage was stabilized. The video can be scaled up to conceal this. (Hence the reason to shoot in a larger resolution format, such as 4K when the output is HD. The video can be scaled up without a noticeable loss in resolution.)
Below is an unstabilized video clip from your source files. (HM_peacock1_DV.mov)
Here's the same clip, but motion stabilized:
See how the head remains stationary, and we can now see the edges of the frame? After Effects is repositioning the video (X & Y) to compensate for the camera movement. Again, this is a reason people capture source footage in a higher resolution format than what they need to output. It gives them reframing and stabilization options.
Let's do some Motion Stabilization!
- Download some of the video clips and copy them to your Media folder.
- Load some footage to stabilize (from the provided SD or HD clips)
- Create a comp from one of the clips and select the footage in the timeline
Tracking and Motion Stabilization commands can be found under the Animation menu. Both of these use AE's ability to analyze footage.
To use Motion Tracking or Stabilization, first you must have a layer with changing frames (motion) and that has a distinct feature to track.
- Be sure to set a Work Area encompassing your footage to track (important)
- Position your time indicator at the beginning of your Work Area
- Select the layer, then choose Animation -> Track Motion
Look at your footage for a distinct feature that is visible the duration of the entire clip. In the peacock clip, you could pick part of the head or the lower right decorative eye, as both are visible the entire duration of the clip.
The Track Point:
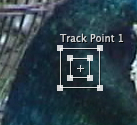
- The track point is broken down into 2 rectangles and an attach point.
- The feature region is the smallest square. It should surround the distinct feature to be tracked.
- The larger box is the search region. It is the area that AE will look for to find the distinct feature.
- The point in the middle is the attach point. It represents the place of attachment for the track point.
To move the track point, drag in the area between the inner and outer squares. Adjust the feature region (inner square) to closely encompass the feature you want to track by dragging its handles. Adjust the search region (the outer square) only if you're tracking a fast-moving object.
You can track in a limited range of frames by first defining a work area.
The Tracker Window:
![]()
- In the Tracker window, click on Track Type: Select Stabilize
- Move the tracking point to the distinct feature to track.
- Press the analyze forward button (right arrow). It should track the area (if you've done things properly).
- Press the "apply" button. A prompt will ask "Apply Dimensions" - you want to X&Y.
- Preview your footage.
If it doesn't work right, no worries- just delete your track and try again. (Repetition makes you better!) To find your track data, twirl down the layer's "Motion Trackers" parameter.
Note: If you select the "Rotation" option, the Tracker will give you two Track Points connected by a line. Place each one on its own unique element to track. This will remedy rotation issues as well as X and Y position movement.
Tthe edges of the video frame will typically become visible with this type of stabilization. You can scale up the video footage to conceal this. (Hence the reason to shoot in a larger resolution format.)
Warp Stabilizer - Now try the Warp Stabilizer command (also found under the Animation menu). Using the same footage try different methods and look at the differences (position / position, scale, rotation / perspective / subspace warp). Also note the different framing options.
In-class Motion Stablization Exercise: In this exercise you'll use at least two video clips to demonstrate two different applications of motion stabilization.
- Make a new comp long enough to hold two of the video clips. (Each clip will be its own layer.)
- Use AE's Tracker: Stabilize feature to steady one of the clips. (Hint: Once you're done, you might need to scale up the layer so that the moving edges aren't visible.)
- Use either AE's Stabilize feature on another clip or alternatively, use Warp Stabilizer on it.
- Add text to label which stabilization tool you used.
When you are finished, render out an Apple ProRes 422, MP4, or H.264 movie called "video" and upload it to the proper Canvas assignment.
Thursday -------------------------------------------------------------------
Share FInal Project Ideas
Motion Tracking in After Effects
Motion Tracking uses a technique similar to Motion Stabilization, but applies the tracking data to a different layer.
Motion Tracking Example:
An interesting variation of Motion Tracking is Perspective Corner Pinning. This can be used to replace signs on billboards or other moving shots.
Perspective Corner Pinning Example:
Take another look at the Tracker Window and look a the attach point (be default, in the middle). You can move this attach point outside of the box. This is important if you are trying to do Perspective Corner pinning.
Try some basic motion tracking. Start just as you did with the Tracker, but before you analyze, move the attach point to where you want the anchor point of the attached layer. You also want to make sure that you set the target layer to be the proper layer. (In the Tracker menu, use the "Edit Target" button.)
Once you hit "apply" you'll see that the Tracker has created keyframes in the Target layer's position property.
If they're not in the right place you can either select them all and move them all at once or you can adjust the Anchor Point.
Once you've mastered that, you can move on to Persepctive Corner Pinning.
Want to try it? Experiment on the KD_streetsign_DV.mov file which was in the zipped sources folder. Here is an HD clip of a monitor you can use if you want to try Perspective Corner pinning.
With video, it's good to first stabilize it (if necessary) and then to track it.
In-class Motion Tracking Exercise: In this exercise you'll use at least two video clips to demonstrate two different applications of motion tracking. One clip will use a single attach point and the other will use perspective corner pinning.
- Find two video clips to work with: one will use at least one attach point (like in the 1st example) and the other will need a visual feature for perspective corner pinning (using either the HD monitor or KD_streetsign" clip).
- Make a new comp long enough to hold two of the video clips. (Each clip will be its own layer.)
- Add graphic elements for each tracking application (E.g., a thought bubble for the first and a license plate or video clip for the perspective corner pinning)
- Track and apply!
When you are finished, render out an Apple ProRes 422, MP4, or H.264 movie called "tracking" and upload it to the proper Canvas assignment.
Homework:
- Read work through Meyer chapters 27 & 30 (Keying & Motion Tracking)
- Come up with an idea for a 60-second final project (or I'll give you one)
- Make an animated countdown that could be either functioning (with your name or company logo used to kick off a demo reel or something) or abstract/artistic (a work of art in itself). Make sure it has:
- Principles of C.R.A.P. applied (Multiple visual elements are needed for this to work.)
- Animated 3D camera or layers
- Audio (natural soundtrack, sound effects, music, etc.)
- Lighting
- A sense of depth
- You may turn in a full-size (1920x1080, square pixel) Apple ProRes422, mp4, or H.264 version.
- Be sure to thoughtfully fill out and submit an accompanying critique form.
- Here are a few to ponder:
