

Jim Krause | Classes | P354/J560 Program Graphics & Animation
Lab 15
Agenda:
- Share Final Project ideas
- AE (continued): Puppet Tool
- In-class Exercises: Puppet Life & Puppet Fun
Resources & Tutorials:
- Adobe help: Animating with Puppet Tools
- How to make a zebra walk from Boone Loves Video (This is a good one and covers new Puppet Tools)
- How to animate a bicyclist from Lynda
- Animating the Overlap tool in AE by Angie Taylor
- Bringing Still Images to life by Rich Harrington
- New Puppet Tool for After Effects by Troy's View
Puppet Tool - Introduction
The Puppet Tool can be found in Photoshop and After Effects. It's versatile with numerous uses, such as animating characters.
But it can also be used in other interesting ways. For instance it can be used to bring still pictures to life. Take another look at the Beauty animation, which uses the Puppet Tool to bring classic paintings to life. It can work in surprising ways, such as animating a particle stream. Here's a tutorial on How to use the puppet tool to animate a particle stream from Aharon Rabinowitz
Exploring the Puppet Tool (Meyer Chapter 35 - ZIP file of sources - 488 kB)
The puppet tool provides an easy to use way to animate layers, such as Illustrator or Photoshop documents. The layers must have non-changing alpha channels- so you need to use still objects. If you had a photo of a character you wanted to animate, you'd first have to separate the subject from the background. It could be saved as a PNG or TIFF with a transparent background, or simply as a cutout layer in a Photoshop document.
When you enable the puppet tool by placing a puppet pin on a layer, it creates an underlying mesh structure. It's good for getting organic-looking movement on layers.
The Advanced Puppet Tool has five kinds of controls. You can press Command-P to toggle through them. NOTE: There are two Puppet engines: Legacy and Advanced. The legacy engine (old school) only had 3 pins (Puppet Position, Puppet Overlap, and Puppet Starch). The advanced (new) tools work a bit differently. Some tools (starch) don't work the same way. You can choose between the modes in the layer timeline
- Position Pin - Use this to set basic control points
- Starch Pin - Use this to stiffen parts / add rigidity
- Bend Pin
- Advanced Pin - Newer version of the legacy Puppet Pin
- Overlap Pin - Use this to specify if pixels are in front of or behind other pixels
The motion paths created by the puppet pins can be changed or adjusted just like any other spatial keyframes.
Motion Sketching is an easy and straightforward way to add keyframes. If you hold the Command button down over a puppet pin a stopwatch appears. Then when you click and drag, it will record the keyframes. You can set the speed and other variables with the "Record Options" button next to the puppet pin tool.
The Overlap Tool allow you to set a value to areas that specify how they overlap other areas. Larger values cover (are in front of) lower values. It's possible to have negative values. Use minimal pins and adjust the extent value. You can even animate/change the overlap pin positions over time.
The Starch Tool works a little like the overlap tool in that you can place a point and set the extent value. This will prevent the area from warping.
TIP: Before you start animating with the Puppet tool, move your time indicator to the first frame and set your initial starch or stiffness values. Also, for parts that are supposed to be in front of or behind other elements, set your initial overlap values.
Puppet Life Exercise (5 points)
Bringing Still Pictures to Life - As exemplified by the Beauty piece, the Puppet Tool can be used to give life to still images.
Look at this tutorial by Rich Harrington. He demonstrates how to use the Puppet Tool with non-character footage- in this case a photograph of an ape. The first part requires cutting out the subject from the background in Photoshop. He covers how to refine edges and use the Smart Fill in Photoshop. The second part covers using the Puppet Tool to add subtle movement to the ape.
- Find an appropriate image to work with. (Make sure it's large enough to work with in HD.)
- Apply the techniques from the Rich Harrington tutorial and create a short (E.g. 10-second) animated sequence from your image.
- Suggested pixel dimensions: HD 1920x1080 or 1280x720.
- When you are satisified, output an Apple ProRes 422, mp4, or H.264 movie called "puppet_life" and upload it to the appropriate Canvas assignment.
Puppet Tool Part 2: Animating Characters
In the resources at the top of the page, How to make a zebra walk from Boone Loves Video is a good one, and covers the new Puppet Tools and how to carry out a basic walk cycle.
Walking: if you want to animate a character walking (a bit of a tricky task) start by examining how a real person walks. You can then explore variations of the walk. Find a series of still images and use these to base your keyframes on. (Google Search: Human Walk Cycle Pictures)
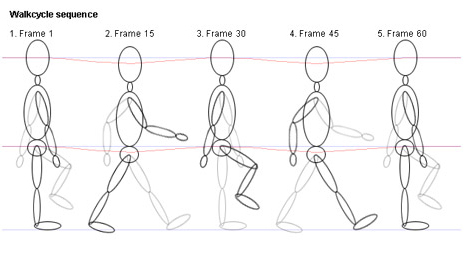
Basing your Puppet keyframes on the walk cycle will help. The example above has 4 different poses (the last is a duplicate of the first). You could make 4 sets of keyframes based on these- or based on any other sets of walk cycle pictures. Once you've got the groups of keyframes down, copy and paste the sets to repeat them. You can then precompose the layer and move it at a speed (matching the gate) across the floor.
Puppet Fun Exercise (5 points)
This exercise provides a chance to practice character animation.
Watch the How to make a zebra walk from Boone Loves Video
Take any of the characters or objects from the book (or from anywhere) and animate them walking or dancing to a soundtrack (something with a good beat- like in this example or this one). Suggested pixel dimensions & length: 1280x720 at 10-15 seconds.
Be sure to use the Overlap Tool to make some part (arm, leg, etc.) be in front at one point in time and behind at another.
Hint: You might want to set layer markers on the audio layer to help fine tune your character's rhythmic abilities.
For the over achievers: To make it more dynamic, add another dimension (put it in 3D space).This opens the door to having a floor, lighting, and shadows.
NOTE: Extra credit points awarded to those who turn in good projects.
When you are satisfied, output an Apple ProRes422, MP4, or H.264 movie with sound called "puppet_fun" and upload it to the appropriate Canvas assignment.
Homework:
- Read & work through Meyer, Chapter 32 (Shape Layers)
- Study for our last AE Open book Quiz (Wednesday)
- Ad with Motion Tracking (Tuesday). Examples:
- Make a 15 or 30 second fake (or real) ad or PSA for anything. It must have:
- audio
- video
- a layer that is obviously motion tracked to a video layer
- good graphic design
- Be sure to note what you did and how you carried out the motion tracking in the accompanying critique form.
