

Jim Krause | Classes | P351 Video Field & Post Production
Summer 2018 Week 1
Welcome! & Introductions
Agenda:
- Course overview, review syllabus & projects
- Do a quick, in class assignment
- Begin cameras
- take lunch break
- Continue cameras
- Homework assignment: Storyboard / Continuity Sequence
- Carry out Field Shoot Exercise
Course description: P351 teaches the technical skills and creative principles required for video field and post production. We'll cover:
- Video camera: lenses, imaging & recording
- Composition
- Continuity (technical continuity vs. continuity-style production)
- Audio
- Lighting
- Editing
- Producing
- Storytelling
As a student field and post was my favorite class. You can do almost anything. You can try your hand at any topic or genre. My personal goals for you are:
- To teach you proficiency in field production & lighting techniques
- For you to become solid editors
- That you'll become better writers and producers
- Provide you with several high quality portfolio projects
Note to Summer Students: This is an intensive summer session course. It is a lot of work in a short period of time. There is quite a bit of production homework outside of lab. You should reconsider taking this class if you are not fully committed or have a significant number of demands on your schedule (job, other classes, etc.).
You'll be making lots of projects- but they are all relatively short.
1 lecture & 3 labs per week. We'll take a half-hour break between Monday's lecture and lab to give you a chance to have lunch.
Circulate roster. Need your name, e-mail & phone number.
Review Syllabus & Class Structure:
- Contact info: email & phone works well. Use the (812) 332-1005 number (not textable - leave a message) Call if you need anything.
- Office hours: Wednesday from 9:30-11:30 AM & by appt.
- Readings are from my own on-line notes and the Television Production Cybertext, found at: http://www.cybercollege.org/tvp_ind.htm
Materials:
We'll be using The Canon XF405 camcorders, which use either SDHD or SDXC cards. Go buy your cards ASAP if you haven't yet. Best Buy should have them. Bring at least one to every lab! You will need one this week.
Who has their own Camera or DSLR that shoots video? You are welcome to shoot projects on your own cameras- but it's important to learn how to use the Sonys. Once you learn the menu structure and all of the features, you'll be able to operate almost any professional video camera.
1TB USB portable drive. Strongly suggested but not 100% necessary. A large drive is needed to move projects from IU to your home system. SSDs are mroe expensive but highly recommended.
No laptops, iPads or cellphones unless DIRECTLY related to class activities. Everything (class notes, asignment info) is on-line so there is no need to take notes.
Food and drinks aren't allowed in the lab or Studio 5. You can have covered drinks around this table. Please make sure you don’t bring in or leave trash. These places only get cleaned once a week. Help us keep it clean.
Attendance/Punctuality
Please attend every lab and be here on time. (Seriously) Not doing so will result in a lowered grade.
Turning in projects - I'm going to try to use IU Canvas for submission of everything. I'm also inviting you all to be collaborators to an IU Box folder. If you run into issues uploading media to IU Canvas, you can use our IU Box folder.
Responsibility/Murphy's Law - Video projects are not like writing term papers. Just editing, finishing, outputting, transcoding, and uploading your video work can take days. Do your work early/ahead of time. There's no advantage to putting things off to the last minute. Doing so will only result in added stress and lower quality work- and an opportunity for Murphy's Law to kick in.
Report any broken equipment to the lab monitor or to the instructor.
Equipment must be returned on time. If for some reason you are late, CALL THE LAB.
Success. What does it take to be successful in this class?
- Both sides of your brain (both right and left) as you need to be both artist and engineer.
- Come to every class and lab on time
- Do all of the paperwork. (Program proposals, treatments, scripts and critiques)
- Stay on top of the weekly readings and study for tests
- Don't wait to the last minute to do your work.
- Take individual responsibility. I'm not going to hound you if you don't turn things in. It's up to you. The level of your commitment is equal to my willingness to help you.
- Prepare for assignments
- Be communicative (an important trait for producers)
Focus on quality not quantity. Don't try to make long projects. Keep projects short, thoughtful, and articulate. You have a unique opportunity in this class to create four strong portfolio pieces. These can win awards, open the door to a job, or help you get into graduate school. Show up on time and do good work. All of you are capable of doing great things in this class- and having a fun and fulfilling time in the process.
When you make a production, strive to make it the highest caliber possible. This means
- You will tell a story or make a point with your work.
- Your project will have a strong ending and clear conclusion.
- Your shots will be in focus, framed nicely, and have proper color balance & exposure.
- Camera movements will be intentional.
- Your backgrounds will compliment the subject and not distract from it.
- Your graphics will follow the rules of good composition and design.
- Your audio will be clear and mixed appropriately.
- You work will have legal integrity: No music or talent will be used without a release.
Strive to become a critical viewer whenever you watch TV or go to the movies.
- Think about the production… observe the details
- Where was the camera placed (high low, tripod, dolly, jib or hand held)
- What is in focus and out of focus?
- Look at the lighting (hard or soft, back and set lights)
- Do the scenes have a mood or feel to them? What is it?
- What motivated the edit? (action, sound etc)
- Watch with the sound turned off
- Close your eyes and listen (music, SFX, close-miked or far)
- Pretend you are the director
- Figure out the process used to create the scene
In class exercise (5 points) : Take out a sheet of paper. Write neatly and fill in the following:
- Name
- Year at IU
- Areas of study/major
- Personal interests/hobbies
- List one TV show you love & one you hate
- What kind of project are you most interested in producing in this class?
- Three things you want to get out of this course. Be specific (documentary portfolio piece, understanding of lighting etc.)
[Process/review roster while class is doing exercise]
Homework for Wednesday:
Prepare a 6-8 frame storyboard which you will shoot in lab on Thursday andbring in for Friday's lab. (see the Storyboard / Continuity exercise for more information). UPLOAD a copy (PDF, PNG, JPEG) of your storyboard to the approporiate Canvas assignment before the start of lab Thursday.
You will be graded on the following:
- 6 – 8 frame storyboard (each shot should have a description)
- Framing, blocking & continuity
- Production & editing
- Your critique
Readings: Begin doing the on-line readings on cameras & lenses. This will be on the first quiz!
For Week 1 please read: cybercollege.org/tvp_ind.htm 10, 11, 12, 13, 17, 18, 19 & 20 (cameras, lenses & viewfinders)
For Week 2 please read: cybercollege.org/tvp_ind.htm 50, 51, 52, 53, 54, 55, 56 & 57 (continuity & technical continuity, editing guidelines and timecode)
- Think about your various projects. Please consider taking on a project for a real-world client. Planning and scripting these ahead of time is critical. Remember that the success of a video is determined in preproduction. If you properly plan and coordinate your project, the production will be easy. The first two coming up are your Interview / Feature stories & Art Videos. Next week in lab you should have a proposal for your Interview / Feature story. You won't shoot this for several weeks, but it's important to plan now. (review assignment)
Camera / lens review:
- CCD - Stands for Charge Coupled Device.
- CMOS (Complementary Metal-Oxide
Semiconductor)
- CCD and CMOS sensors convert light to electrical energy. Lens diameters match CCDs, so a 2/3" lens would be mounted on a camera with 2/3" CCDs. The bigger the CCD, the more pixels you can fit on it. (The Sony Z1Us use three 1/3" CCDs, the Z7Us have 3 1/3" CMOS imagers, the Thompson cameras in Studio 5 use 2/3" CCDs)
- Resolution (Horizontal resolution is determined by the maximum number of vertical lines resolved. Requires a test chart.) The studio camera heads can resolve about 700 lines. VHS tape can only resolve about 230 lines.
- Gain (boosts signal and adds noise)
- Focal length: (Don't confuse with depth of field!) the distance from the optical center of the lens to the focal plane (CCD or target) of the camera). When focused at infinity, a 10 mm lens will be 10 mm from the film plate or CCD.
- Zoom lens - The focal length can be continuously varied
- Angle of view (Telephoto lenses have narrow angles of view, while wide angle lenses have wide, or large angles of view.
- Zoom ratio: Often (but not always) given in a ratio or two numbers (e.g. 12 x 10) The first number represents the minimum focal length in millimeters, and the second number the multiplier. A 12 X 10 zoom lens would have a minimum focal length of 12mm and a maximum focal length of 120mm.
- Compressing distance: telephoto lenses provide the effect of compressing distance
- Changes in apparent speed: Telephoto lenses also have the effect of slowing down Z motion. (The Z vector is directly in-line with the lens- as opposed to up and down or let to right.)
- Perspective changes - Wide angle lenses can cause distortion
- What is "normal”? A normal lens captures a field of view without visible distortion and that looks natural. To calculate the normal lens, measure diagonally from corner to corner. (e.g. a 50 mm lens would be "normal" for a 35 mm camera.
- Lens speed - Lenses which let lots of light in (have large apertures or are capable of small f-stops) can be labeled as "fast". These usually cost quite a bit more than their "slower" counterparts.
- F-stop - These numbers are inversely related to size of the aperture or iris opening.
- Depth of field - the range of distance that objects will be in focus
- Relationship between depth of field and f-stop - the higher the f-stop (smaller aperture) the greater the depth of field you will have.
- Relationship between lenses and depth of field - wide lenses will have a greater depth of field than telephoto lenses.
- Selective focus (related to rack focus and follow focus)
- Follow focus
- Rack focus
- Macro focus
- Auto focus (problems with)
- ND filters - Neutral density filters don't influence the color temperature. They are gray and translucent. There purpose is to minimize the light coming into the camera.
Sensors
The lens focuses the light onto an imaging or pickup device. In the old days cameras used tubes, these days CCDs (Charge Coupled Device) or CMOS (Complementary Metal-Oxide Semiconductor) sensors are used. CMOS sensors are beginning to become more widely used as they are a bit easier to manufacture and use less power than CCDs. The tiny camera in your laptop or cell phone most likely uses a CMOS imaging device.
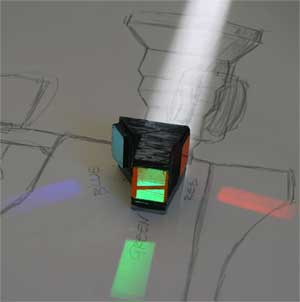
Most professional video cameras use a beam splitter, which consists of prisms. The incoming light is split into its primary components, Red Green & Blue and recorded onto three separate CCD or CMOS imaging elements. These elements are about the size of a postage stamp and convert the light energy into an electric charge. While the industry norm has been to use three imaging elements, a growing number, such as the Red One, are using a large, single CMOS sensors.
Here's a nice picture of a prism block from Adam Wilt's amazing and informative website:
Sensitivity
How much light does the camera need to operate? This is called minimum illumination or sensitivity. It’s measured in foot-candles (American) or lux (European) usually along with the required f-stop and gain needed to capture an image. For example Panasonic's AJ-SDX900 reported minimum illumination is 0.01 lux (F 1.4, +48dB +20dB gain).
F-stop - An f-stop represents the size of the aperture in an inverse manner. A large f-stop corresponds to a small aperture, or opening in the iris. A small f-stop represents a large opening. You should know your standard whole f-stops: 1, 1.4, 2.0, 2.8, 4, 5.6, 8, 11, 16, 22, 32.
- Increasing one whole f-stop will cut the light in half (E.g. going from 5.6 to 8).
- Decreasing one whole f-stop will double the light (E.g. going from 5.6 to 4).
F-stop and Depth of Field: The larger the f-stop (smaller the opening) the greater your depth of field will be. The smaller the f-stop (larger the opening) the smaller/shallower your depth of field will be.
Think about this: You are at the Grand Canyon and want to capture a sweeping landscape with your DSLR and want everything in focus. What f-stop will you use?
and this: You are capturing a MCU of your talent and you'd like to make the background out of focus to direct focus to your subject (and make it more cinematic). What f-stop will you use?
HDTV - The broadcast of NTSC (analog video) ended in Feb. 2009. Now video is broadcast digitally following ATSC (Advanced Television Systems Committee) standards. Digital TV (DTV) supports both standard and high definition formats. In other words it allows for multiple frame sizes and frame rates and also progressive scanning.
Progressive Scanning: The electron beam scans each line sequentially. It does not use two interlaced fields.
ATSC HD delivery formats:
Horizontal lines |
Vertical lines |
Frame Rate |
1280 |
720 |
60p, 30p, 24p |
1920 |
1080 |
60i, 30p, 24p |
Note that many HD production formats do not record the full pixel dimensions listed above. Some use few pixels horizontally, and then stretch the image upon output to the full pixel dimensions.
Interlace Scanning vs Progressive:
Some formats use progressive scanning instead of interlacing.
In interlaced scanning we scan first the odd frames for the first field and then the even lines approximately a 60th of a second later. You get (roughly) 30 frames each second or 60 fields per second. The interlaced scanning was developed for broadcastTV and is not the ideal manner to deliver videos via the web.
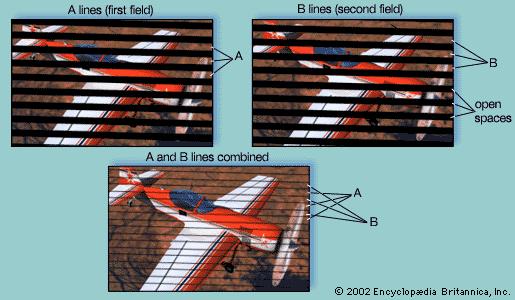
(Image courtesy Britannica.com)
Progressive Scanning: The electron beam scans each line sequentially. It does not use two interlaced fields.
Aspect Ratio
Aspect ratios should be provided in width to height. HDTV is 16:9.
- 4 x 3 (or 1.33:1) Used in the "classic" era of TV, before DTV and HDTV (Think "I Love Lucy" or "Star Trek")
- 16 x 9 (or 1.78:1)
Continuity Style Production
#1 rule: Don't confuse the viewer! This is why we strive to maintain continuity. Preserve the illusion of space & time. People and objects remain faithful to their positions (this can be tricky over days of shooting)
Edits must be motivated for the best continuity. When shooting think about how you will get from one shot to another. Will action motivate the edit? A sound?
Viewers create mental maps of where things are and expect time to progress forward.
A Master Shot, which is often a wide shot, establishes the initial relationship of people and things within a given scene or location. You can preserve this illusion by using the 180-degree rule when you shoot.
Review the 180-degree rule. (two people sitting at a table)
How to cross the line:
- Subject changes attention or move gaze to establish a new vector.
- Shoot down the line
- Subject moves
- Move the camera over line (dolly, crane etc)
- Use a cutaway, then come back to your scene from a different vantage point
Viewers are getting more used to seeing the rule broken.
Insert shots – close up from a larger shot
Cutaways – cut away to something related (could be something happening simultaneously)
Technical Continuity
Unplanned changes in sound, lighting, props, video texture, or setting is referred to as a technical continuity problem.
Moviemistakes.com has lots of fun examples of technical continuity problems.
A famous one is in T2, when the T2 liquid robot cop is chasing Ahnuld and little John Conner. The T2 is driving a semi, Ahnuld & John are on a motorcycle down in a drainage canal. The T2 drives the semi off of the overpass down into the canal, and we can clearly see the windshield popping out. In the next shot of the front of the semi, the glass is back in the semi. That's an example of a technical continuity problem.
While your productions are not likely to suffer from an elaborate problem such as this, beware of common mistakes:
- Changes in color temperature. Avoid mixed lighting locations and white balance whenever you change the locations.
- Changes is light levels Keep lighting levels consistent within a scene.
- Primary Audio - use the same mic, in the same manner when recording your talent. (Don't use a lav in one scene and a handheld on a stand in another)
- Background audio - avoid abrupt changes within the same scene. Always record 60 seconds of ambient sound, which you can layer in to the audio mix.
Lab this week
- Today: Field Shoot Exercise
- Wednesday: Storyboard / Continuity Exercise
- Thursday: Review Storyboard/Continuity Sequences / Edit lesson
Readings and Homework (due by next week / Tuesday):
Readings:
For Week 1 you should've read: cybercollege.org/tvp_ind.htm 10, 11, 12, 13, 17, 18, 19 & 20 (cameras, lenses & viewfinders)
For Week 2 please read: cybercollege.org/tvp_ind.htm 50, 51, 52, 53, 54, 55, 56 & 57 (continuity & technical continuity, editing guidelines and timecode)
Homework:
1-page critique for your Storyboard / Continuity sequence
Carry out the pre-production work for all of your class projects. (Please remember to consider producing a project for a real-world client.)
- Art video proposal and treatment due
- Interview/feature story proposal and treatment due (who, what, when, where, questions, etc.)
- News Exercise topic, questions, reporter intro script due
- Drama/Storytelling pitch, proposal and treatment due
Back to Jim Krause's Summer P351 Home Page
